pages

Monday, June 30, 2014

Bit Charge Vs Real Drive Nano Vs Car in a Can

There is nothing digital proportional about these little cars but I'll talk about them anyway.


Real Drive Nano cars are 1/58 size cars produced with excellent detail.  The first released series, were Ferraris then later other makes, models and sizes. They came out in late 2000 so they aren"t anything new. What makes these tiny countertop racers cool is the attention to detail for their scale and being an officially licensed product.  The trademark logos and decals are pretty clear being so small. Real Drive Nano cars require 3 watch size batteries for operation inside the car and another 2 for the controller. There is not much to offer in speed but it makes up for it in high gloss cherry red finish. It uses Infrared (IR) to control the car so there shouldn’t be anything blocking its line of sight for good reception. Also there is no need for an antenna to disrupt the fine lines of these micro miracles. They are fully functional left - right – forward - reverse and a small turbo button on top of the controller.  You’ll enjoy running them with working amber headlights.


1/58 scale Ferrari Enzo RC
Real Drive Nano micro 1/58 scale RC

Enzo RC
Enzo Ferrari RC

Bit Char-G Cars are more comical in looks. The bodies are scrunched and cute looking. If you like the app Mini Motor HD, then you will enjoy racing this micro RC. They run at 27 MHz, on different channels.  Bit Char-G cars are faster than the 1/58 Real Drive Nano cars. These were perhaps the first micro cars you could actually upgrade with optional parts, like faster motors and additional gears.  The motors used in them were first used in mobile phones and the method of charging them was based on the same principal of cellular phone. It only takes a small amount of energy to quickly charge the rechargeable battery inside.  It has a highly visible antenna coming out of the rear window of the car. Sometimes they jitter from poor reception maybe do to nearby interferences. There is a built in rechargeable battery inside the car that gets its juice from 2 AA batteries in the controller.  Bit Char-G are just fun to have.  


BB512 Ferrari Bit Char-G RC
Super Bit Char-G BB512 micro RC

RC on charging dock

Next on the line is the ever so popular Car in a Can. First of all the most unique selling point is its package. You got a micro car in a display soda can size container. This interesting idea put everything you needed in one cool container. You get the car and the controller and a nice set of racing cones. Car in a Can are more similar to Bit Char-G style of charging. Also charged by the controller you just plug a little line into the bottom of the car. Charging usually takes about 3 minutes. This car actually runs the smoothest of the three, and is very quick. It is also fully functional and has bright white headlights it's quick on turns. You cannot upgrade anything on them. It still has an antenna sticking out but it is nearly unnoticeable when driving. The thing about this series of cars is after the first release many other companies hopped on the craze, so if you bought one, the name style and quality may be different. Many not officially licensed, but have the look of popular cars.


Car in a Can micro racing

RC car in a can
Mini RC Car in a Can

Now after a brief over view on all three my personal favorite has to be the officially licensed car in a can for it exquisite looks and style. It makes for a proud display and a quick tea break race. 

Micro Rc Challenge
Micro RC cars


Tuesday, May 20, 2014

Keeping it cool! Installing a fan on your TT02 chassis.

            It's necessary to take breaks during your runs to give the RC time to cool it’s motor. 
Sometimes your laps or runs may be cut short from overheating from hot weather. Some RC car systems have good electronics that detect and prevent malfunction to your car. The car may auto cut off to protect it self. To improve your run times you may want to install a cooling fan on top of the motor. You have a couple of ways to use it. One is just after a drive so the motor cools down quicker or while driving but may still consume more power from the battery. I prefer after a run because the left over energy from the battery is still sufficient enough to run the cooling fan for five minutes or more. This can help bring down the motors temperature much faster and get it ready for your second battery. 

The first thing you need to do is buy a few things. 
1. One 30mm  cooling fan. 
2. One 30mm cooling fan cover. 
3. Two 18cm screws. Make sure the diameter fits the holes. 
4. Extension power cable if necessary. (may come with fan)
5. One LED 3 bulb if using a laminating cover. 


           I picked up a Wild Turbo brand 8.4v fan. Also an illuminating fan protector by Active Hobbies, they come in various colors. The illumination adds a bit of excitement to the look of the fan. Start by removing the four screws from the original motor cover. The part that says caution hot. Place the cover and screws in a safe place for future use. Place the fan and protector on top in it’s place. A couple things to be aware of is to check and see that the fan is blowing down. The other is to make sure the fan position properly so it will rotate. The magnets inside the motor could interfere with the fan’s rotation. When it is all set up the LED will run off the Tamiya light unit and the fan from the last slot on the receiver. 

TT02 cooling fan
Cooling fan installed on a TT02 chassis.


cooling fan

Hot looking, really cool motor fan.

Remove from chassis.

Use for installation of fan and protector.


Tuesday, April 29, 2014

Installing lights on a Mini-Z Corvette C5-R 2000

I wanted to get just the right body for one of my favorite Mini-Z chassis which happens to be the MR-015 AD band. I chose to buy the very popular Corvette C5-R 2000. This body is one of the few collector auto scale bodies with pre-installed front and rear light sockets. This is great because there is no need for any drilling. I shopped around and was lucky enough to grab up one of the last remaining classic original Kyosho light units available on the net.
         I managed to get my hands on a now rare and out of production MZW31 accessory light set III. This one was straight out of Shizuoka Japan. Why did I choose this light unit? I just thought it would be well suited for this now also classic MR-015 chassis. If you happen to own one of these original production items don't throw them out someone may just be looking for it. On the small scale of cars this is vintage.


Mini-Z light set
Rare MZW31 light set


MZW31 slim type light set works with throttle control.

I really like this Corvette scale body. This one is compatible with the MR-015 and MR-03.
If you wanted to jump in and buy a Mini-Z now it would be better to get an MR-03 because your choice for auto scale bodies is wide. The chassis will accommodate any body you like. 

Mini-Z Auto Scale collector body
Corvette C5-R 2000 collector body 


First pullout the plastic light place holders front and rear.

4 caps in all

Unravel the light unit and pair up the wires. The two black wires are for the front headlights they are white LED. The red pair are for the rear tail lights they are red LED. Plugging in the lights is the simple part. The main task is positioning the light unit to the body so it does not interfere with the chassis and operation of the RC. If you are not using a damper system it may be easier to position.
The light unit comes with double sided tape to help you set it in place. Once in place make sure the wiring is also positioned and taped to good locations so they don't interfere with rotating parts. 


The lights are powered by the car so the next step is to connect the necessary wires to the chassis. They should fit right in the same location as the motor's power source. You may need to remove any friction plates or dampers for proper installation. 

Light unit power supply wire from chassis.


Complete set up.

If you were wondering this is the transponder unit for racing.
This transponder connects to the car's I.C.S port to power and sends lap results to a computer.


Mini-Z Corvette C5-R 2000 with gold disc brakes.


RC Corvette with lights
Mini-Z Corvette C5-R 2000 headlights. 

Mini-Z Corvette C5-R 2000 rear taillights. 


Tuesday, December 31, 2013

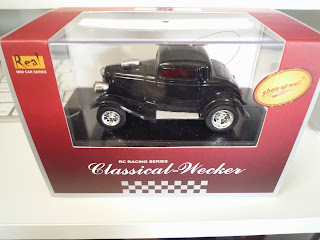
The Classical Wecker mini RC

The Classical Wecker mini RC. 
This is a nice micro Rc I decided to pickup. It looked so cool that I couldn’t pass up the chance to have one. There are at least twelve styles of these European classical cars. It’s 1/48 scale fully functional forward, reverse, left, right with front and rear lights. 

The head lights are very bright and it moves very well for it’s size. The package is quite nice, it serves as a display case when not in use. It also houses the controller. It responds very well and is fast enough to enjoy a good race with friends. 


Thursday, November 28, 2013

Replacing Wheel front uprights / hubs on a TT02 chassis

So here is why sooner or later you'll have to replace the feeble plastic parts the standard TT02 Tamiya chassis. Years ago the standard plastic parts that came in RC combo kits were made much better. You really had to suffer a hard crash for it to break, such as to the curb. I've driven the TT02 as standard without any up grade parts for just a couple months. As I thought the weakest part of this chassis is around the wheels. Just a few hours of drifting and the "front uprights" gave out. The uprights gave out just under natural stresses.  Well it's time for the upgrade!

Front upright/ hub

Sheared off axle from drifting buckled under pressure 


Here is what I'll be replacing it with. 
Square brand aluminum front uprights 

These weren't cheap but they add a mighty cool touch of class. They are solid machined peace of aluminum. Cheers to durability!!! 


Square TT02 Front Upright for  Tamiya

The rear sets are on a four month back order. Really popular!


I decided well why stop there let's additional upgrades for called for so installed ball bearings new gear box joints and disc breaks. Just a few extras and the chassis has a new appeal.